
This section details each of the actions you can take on the Create Table interface to generate a schema for your Data Table, mainly:
- Setting the Table Name
- Adding a Variable
- Adding Categories to a Variable
- Viewing the Table Preview
- Moving a Variable between rows and columns
- Configuring Variable Totals
Additional functionality covered include:
- Deleting a Variable
- Renaming a Variable
- Changing the order of a Variable
- Removing a Category
- Changing the order of a Category
- Renaming a Category
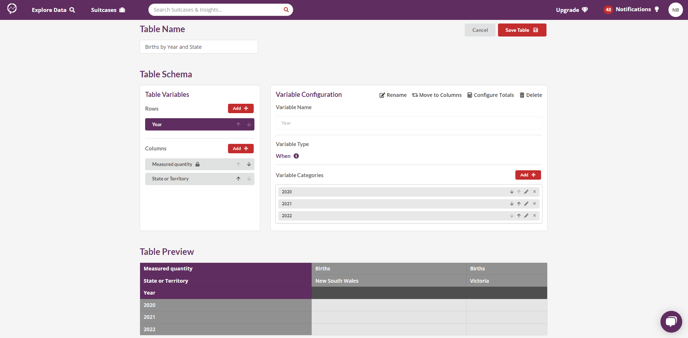
Here is an example of a configured table for reference:
Setting the Table Name
Enter the name for your table in the text input below the Table Name heading.
Adding a Variable
Click the Add button next to Rows or Columns in the Table Schema > Table Variables section. A modal popup will display. You can add a Variable in one of two ways:
Select a variable
This tab allows you to select Variables of either type Location or Time from a dropdown. Select a type and Variable to add to continue with this method. This method is recommended for these Variable types so that the data you create is more comparable across your own and other datasets.
Search or create variable
This tab allows you to search for existing Variables that exist on any of the datasets you have access to. Or if you can’t find the required variable you can freely enter a new variable name to create.
Adding Categories to a Variable
To add Categories to a Variable, first select the Variable in question by clicking on it’s name in the Table Schema > Table Variables section. Then in the Variable Configuration > Variable Categories section, find and click on the Add button.
A modal will pop up. For all Variables you will have the option to search over and select the Categories that exist for the Variable in question on any of the datasets you have access to that contain the Variable in question, along with being able to enter a new Category that does not exist yet.
Alternatively for the Variables listed below, you will be able to autogenerate Categories quickly by clicking on the Generate Categories button that will show only for these Variables and then filling out the corresponding form:
- Year Quarter
- Year Month
- Year
- Financial Year
- Date
Viewing the Table Preview
At the bottom of the table creation page beneath the Table Schema section you can find the Table Preview section. Once a valid schema has been configured. You will be able to see a preview of what this will look like from a data entry perspective in a format similar to a spreadsheet.
This is a good place to review the schema and additionally to determine if the row/column format is intuitive.
Moving a Variable between rows and columns
To move a Variable, first select the variable by clicking on it’s name in the Table Schema > Table Variables section. Then click the corresponding Move to Columns or Move to Rows button in the Variable Configuration section actions row.
Configuring Variable Totals
Totals configuration allows you to add a Totals category to a Variable that can either be manually entered or automatically summed for all of the other Categories of the Variable in question. In our example above, if we set summed totals for the Variable State or Territory, a Totals category will be appended and when data is entered by a contributor for all the other Categories of the Variable in question, the summed total will be automatically updated.
To configure totals for a Variable, first select the variable by clicking on it’s name in the Table Schema > Table Variables section. Then click the Configure Totals button in the Variable Configuration section actions row.
A modal will popup allowing you to set totals for the Variable to either Manual, Summed or None. Select the desired option and click the Update button.
Deleting a Variable
To delete a Variable, first select the Variable by clicking on it’s name in the Table Schema > Table Variables section. Next click on the Delete button in the Variable Configuration section actions row.
Renaming a Variable
To rename a Variable, first select the variable by clicking on it’s name in the Table Schema > Table Variables section. Next click on the Rename button in the Variable Configuration section actions row. Enter a new name in the text input box and click the Update button.
Changing the order of a Variable
To change the order of a Variable, first find the Variable you wish to reorder in the Table Schema > Table Variables section. Then click the up or down arrows to the right of the Variable name to reorder accordingly.
Note: Row Variables in the data entry table will appear left to right. Column Variables will appear top to bottom.
Removing a Category
To remove a Category, first select the Variable the Category belongs to in the Table Schema > Table Variables section. Then in the Variable Configuration > Variable Categories section, find the Category you wish to remove and click on the cross (x) icon button to the right of the Category name to remove it.
Changing the order of a Category
To remove a Category, first select the Variable the Category belongs to in the Table Schema > Table Variables section. Then in the Variable Configuration > Variable Categories section, find the Category you wish to remove and click on the up or down button to the right of the Category name to reorder it.
Renaming a Category
To remove a Category, first select the Variable the Category belongs to in the Table Schema > Table Variables section. Then in the Variable Configuration > Variable Categories section, find the Category you wish to remove and click on the pencil icon button to the right of the Category name. A popup form will appear. Enter a new name and click the Update button to finish renaming the Category.